Nespresso’s Aeroccino milk frother allows you to create different styles of milk froth depending on the beverage or recipe you want to make. Some recipes require higher or dense foam, others work with light foam, and sometimes, you don’t even want foam, but hot milk only.
In this post, I will show you how to use each whisk in your Aeroccino frother.
Nespresso Aeroccino Whisk Differences
To understand the difference between Nespresso Aeroccino whisk differences, you need to know which model of Aeroccino you have. (See pictures below).
- Aeroccino 3 has two type of whisks that you need to switch to achieve cappuccino or latte foam.
- Aeroccino 4 has a single whisk that doesn’t require changing to make different foam types.
I have split this guide into two sections, one for Aeorccino 3 whisk instruction and another for Aeroccino 4.
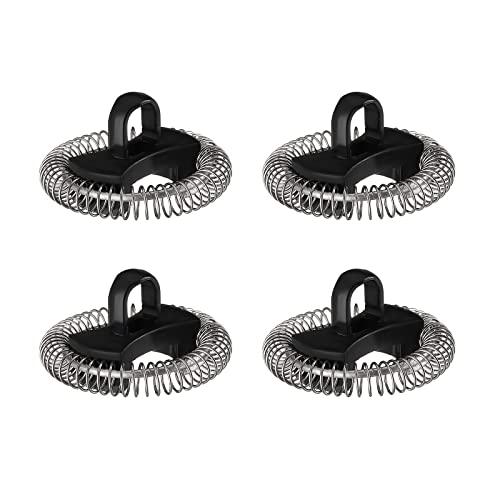
Nespresso Aeroccino 3 Whisks
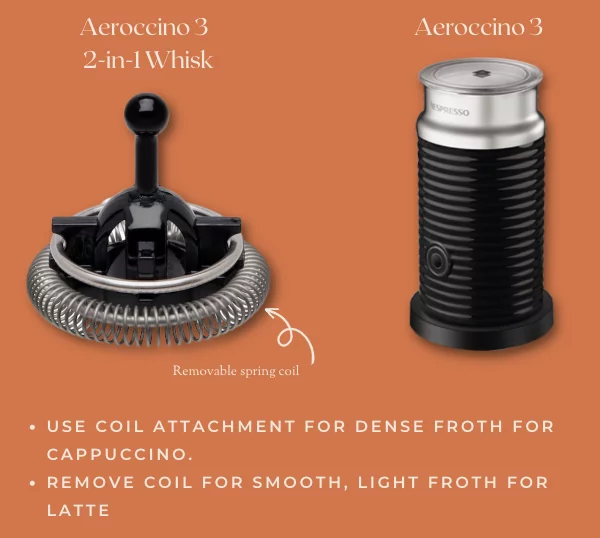
Aeroccino 3 includes a plastic whisk with a round metal spring. When frothing milk, this whisk attachment should always be in its place (make sure it is sitting correctly, otherwise, the Aeroccino won’t spin).
- If you want to make a recipe that requires dense or high foam, like Cappuccino or a Latte Macchiato, use the whisk with the spring attached to it.
- For recipes that require lighter foam, like a latte, remove the spring attachment and place the plastic part only.
How Many Whisks Does Aeroccino 3 Have?
It comes with a single whisk, but it doubles as two when removing the spring. So it’s not two separate whisks, but just a single piece.
Does Aeroccino Plus Use the Same Whisk As Aeroccino 3?
Aeroccino 3 and Aeroccino Plus (discontinued model) don’t use the same whisk design. The Plus model came with two different whisks, one with the spring and another without it. Aeroccino 3 came as an updated design and it comes with one whisk that does two styles of milk froth by simply removing the spring or attaching it.
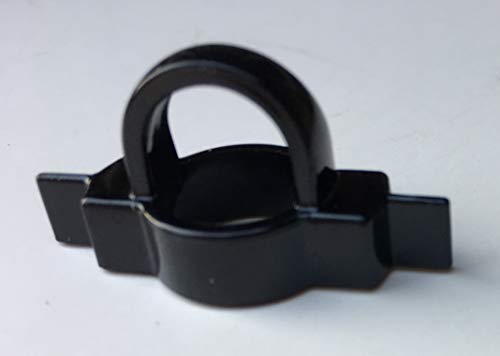
Nespresso Aeroccino 4 Whisks
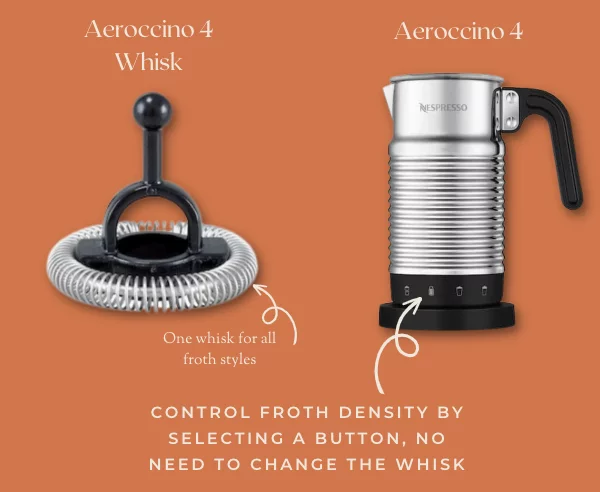
Aeroccino 4 (pictured above, the Aeroccino 4 Refresh) is an easier frother to use. It uses a single whisk operation, so no need switch up a whisk or add/remove a spring. Instead, you’ll select the option for your desired milk density.
The Aeroccino 4 has four milk preparation selections: hot dense foam, hot light foam, hot milk and cold foam. Select the type of foam you want without removing the whisk or changing it.
Nespresso Aeroccino Max Lines
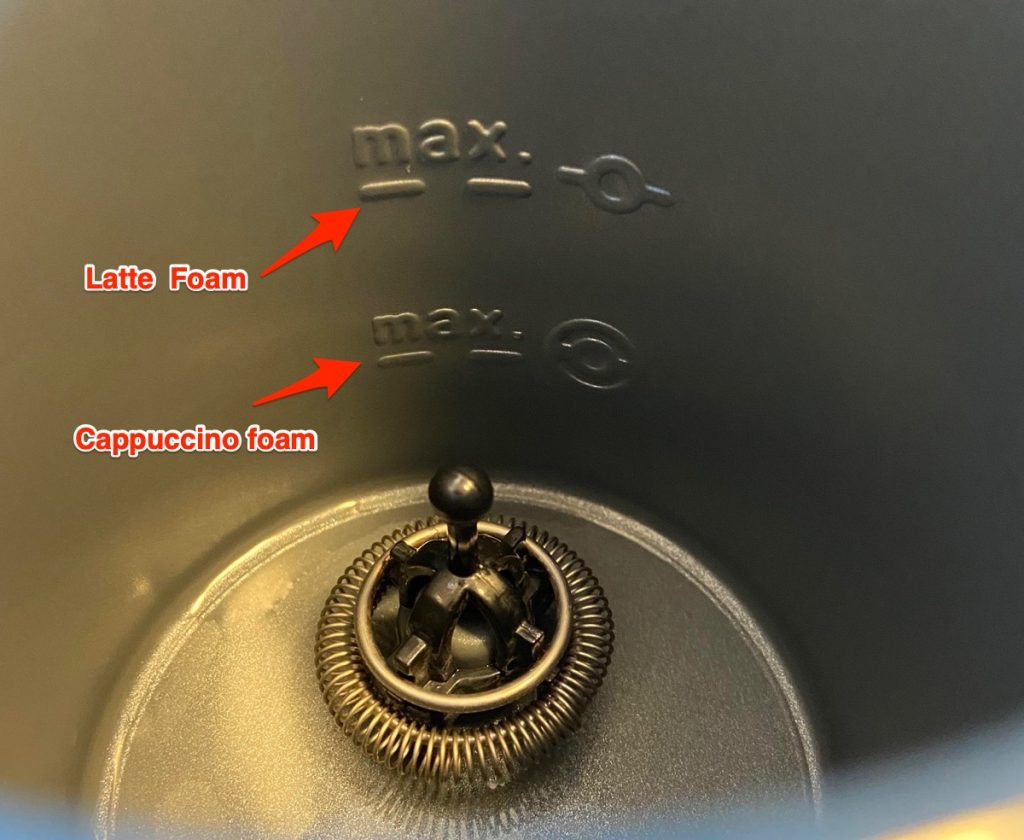
The Nespresso Aeroccino Max lines indicate how much milk you should add for each type of milk preparation. For dense foam, use the lower max line (because the milk will double in size). If you fill the milk over this line, your froth will most likely overflow.
The higher Max line is for lighter foam. So if you’re preparing a Latte, you can fill your milk up to that line.
Can You Use Aeroccino Without the Whisk?
No, Aeroccino frothers do not operate without the whisk. Before use, make sure that the whisk is correctly attached for the machine to operate.
Without the whisk attachment, your Aeroccino won’t start. But you can keep the attachment (the tiny plastic part) and remove any coils and springs from it to make hot milk only.
Here is a guide from Nespresso Aeroccino 3 manual.
Nespresso Frother Whisk Replacement


Did you lose your Aeroccino’s whisk and now you can’t operate the frother? I know it happened to me once when cleaning my milk frother. Luckily, finding a replacement is easy! I listed a few options that I found on Amazon in the box above. Your other option is to contact Nespresso’s customer service and ask how they can provide you with a replacement part, since they don’t list it on their online store.
How To Clean Aeroccino Whisks
To clean the whisks on either model of Aeroccino’s whisk, remove it and wash it by hand. It is recommended that you remove the spring when washing to get rid of any residue that could be stuck inside.
Related Reads:
- Nespresso Aeroccino 3 vs 4 vs Barista Recipe Maker
- Aeroccino 4 vs Breville Milk Cafe
- Aeroccino vs Steam Wand
- How To Make Latte Art with Aeroccino