
If you own a Breville espresso machine, you may have encountered a situation where the clean light starts flashing. This happens after a while of using your machine and it’s time to clean it.
In this article, I’ll explain what the flashing ‘Clean’ light means, and what you can do if this light continues to flash even if you clean the machine.
The steps below should work for any Breville espresso machine, except for automated models like the Barista Touch or Oracle Touch.
The Meaning of Breville’s Flashing Clean Light
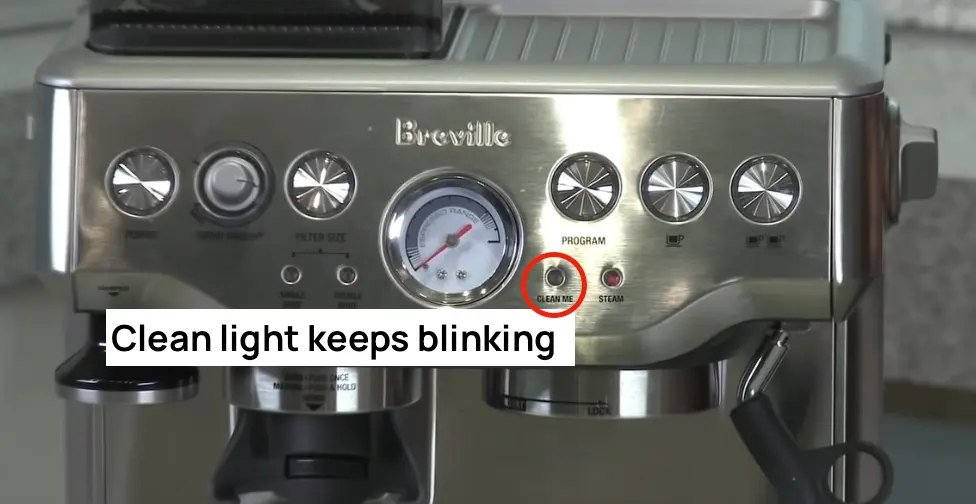
The clean light on your Breville can either flash (blink on and off) or turn on in a solid state.
- If the Clean light is steadily ON, this means it’s time to descale your machine.
- If the Clean light is flashing, it means it’s time to clean the group head only.
Below, I will explain how you can troubleshoot the blinking Clean light, how to correctly clean the group head, and what to do if the light won’t turn off.
Cleaning the Group Head
Cleaning the group head of your Breville espresso machine requires cleaning tablets. Your machine might have come with some. If not, you can purchase these from Amazon. You don’t have to use Breville’s tablets, you can buy them from any brand available to you.
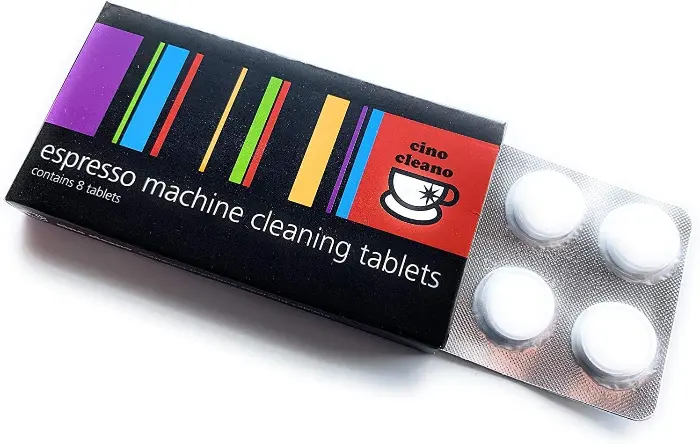
Once you have these tablets, here’s how to use it and start the cleaning process:
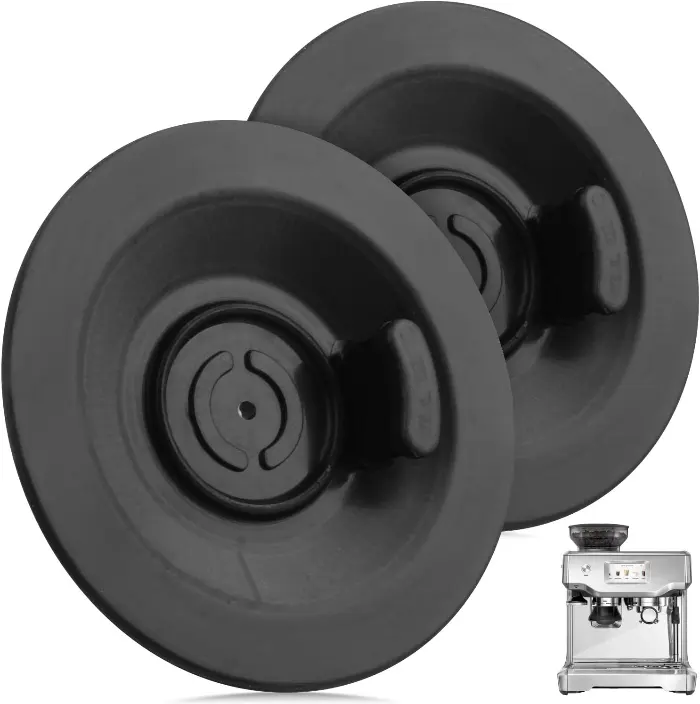
- Attach the backflush insert (cleaning disc insert) to your portafilter, which is included with your machine. The insert goes inside the single-shot basket. If you don’t have one, they are available to buy. Check below for recommendations.
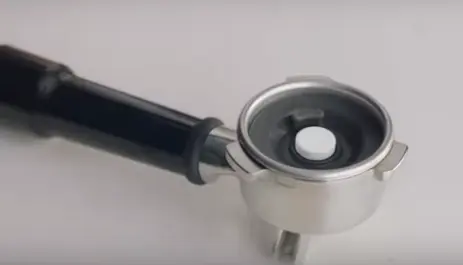
- Drop one tablet inside the portafilter and attach it to the group head.
- To start the cleaning process, while the machine is off, press and hold the single and double espresso buttons and then press and hold the power button.
- Keep pressing all three buttons together for around 7 to 10 seconds until the machine starts. You can now stop pressing.
- The Clean light will start flashing, and you’ll hear the pump working.
- You’ll notice the water will start to come down the drip tray from the backwash (the area behind the front panel).
The water will not be released from the portafilter.
The process takes about 5 minutes to complete. You’ll hear 3 beeps then the Clean light will turn off, which indicates that the Group head cleaning cycle is successfully complete.

Now all you have to do is wash the portafilter to get rid of any residue from the cleaning tablet.
Recommended Cleaning Accessories


If you are missing the disc insert, check these out. Make sure you are buying the correct size for your portafilter. Check my Breville portafilter size guide to know what your machine’s size is.

This cleaning kit by Roobi is fantastic value for the price. You get 52 cleaning tablets and 6 water filters, which is a one-year supply. But it can even last you longer, depending on your usage.
Alternative Cleaning Method with Vinegar and Water
If you are sensitive to chemicals, you can use an alternative cleaning method with vinegar and water instead of using the cleaning tablet.
Fill up your water tank with half vinegar and half water, and go through the cleaning process without using the cleaning tablet inside the portafilter.
While this method may not be as effective as using the tablet, it still does a great job of cleaning the group head.
Also, you’ll want to thoroughly clean the water tank after using vinegar to avoid transferring the vinegar taste to your coffee.
The Clean Light Won’t Turn Off
Now you have completed the group head cleaning cycle, there’s a good chance that the Clean light will turn back on, this time it’s not going to be flashing, but it will stay solid. This means that you need to descale your Breville machine.


Descaling your espresso machine is a more inclusive process that cleans the internal parts of your machine, not just the group head. It gets rid of mineral build-ups and calcifications and maintains machine temperature and brewing capabilities.
To start this process, you need a descaling solution (from any brand available to you). This time, I don’t recommend using a mixture of water and vinegar because it’s not strong enough to clean limescale and minerals.
Steps to Descale Your Breville

- add a mixture of 43 oz of water with 4 oz of the descaling solution in the reservoir. If you have the water filter installed, remove it.
- Remove the portafilter, if attached. Place a container under the group head.
- To start the descaling process, while your machine is OFF, press and hold the double espresso button and then the power button. Keep holding them together for 5 seconds until the machine starts.
- The machine will start flashing to indicate that you are in descaling mode.
What you should see now is: that the power button is on and the single cup button is on.
- Press the single espresso button. Water will start to come down from the group head. Wait until it automatically stops.
- The next step is to turn the dial to the hot water position, which will release water from the hot water spout. Wait until it stops then turn the dial off again.
- The third step is to turn the dial to the steam position to release water from the steam wand.
Repeat these three steps until the water tank is empty, or just under the minimum level. It will take about 4 to 5 cycles.
Now, take out the water tank and wash it out from the solution residue, and then fill it up again with fresh clean water to start the rinsing cycle.
Steps To Rinse the Machine
The rinsing cycle is the same as the descaling cycle, the only difference is that you are now using clean water to wash out the descaling solution.
At this point, the power button and single espresso button will be on.
- Place an empty container under the group head and water spout.
- Press the single espresso button until it automatically stops,
- Turn the dial to the hot water position.
- Then, release water from the steam wand.
You will repeat these steps until the water tank is empty.
This is where most users go wrong. You have to repeat these steps SEVERAL times until the machine runs out of water. If you do it just once, the clean light will not turn off.
The Last Step
When you finish the rinsing process make sure that the tank is empty and no water is coming out. The last thing you need to do is press the power button to turn the machine off. This is the last step of the descaling and cleaning process.
You can immediately turn the machine back on and you’ll see that the Clean light has finally turned off!
Additional Troubleshooting Steps
If you’ve completed the cleaning or descaling cycles and the Breville clean descale light continues to blink, don’t worry. There are a few additional troubleshooting steps you can try to resolve the issue. Follow these tips to get your Breville appliance back to optimal functioning:
1. Unplug and Wait
First, try unplugging the machine from the power source and wait for a few minutes. This can help reset the internal sensors and clear any temporary glitches that may be causing the clean descale light to stay on. After the waiting period, plug the machine back in and see if the light persists.
2. Repeat The Cleaning Cycles
If the light continues to blink after unplugging, repeat the cleaning cycles once again. With the water tank full of clean water, repeat the cleaning steps above until the tank is empty.

No Comments